
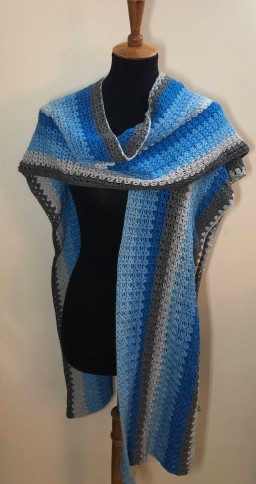
The Bimini Ruana
The Bimini Ruana is the sister to one of my more well known patterns– The Caribbean Ruana. I have received a lot of inquiries on how to adjust The Caribbean to other sizes.. As a result I thought it would be more productive to design a larger Ruana. The Bimini has the same stitch technique with a few modifications.
- One .. It is made with a lighter yarn, making its movement flow
- Two.. Its 100% cotton.. Breathable and easier care
- Three.. Its wider and longer. Approx a Med/Lrg Size
What you will need…
4 cakes of Yarn Bee’s Sugarwheel Cotton..
Color is your choice but I used Better be Blueberry
7mm Hook
Scissors, Measuring Tape & Tapestry Needle
Need To Know..
SC – Single Crochet
DC – Double Crochet
Pattern Notes..
The majority of this Ruana is made with using the V- Stitch.
This pattern is continuous.. It is not made in panels and sewn.
I did not use a border for this pattern.. I felt it looks great without it.
Pattern…
Chain 202
Row 1.) 2 DC’s in 3rd chain from hook, *skip a chain.. 2 DC’s next chain.* Repeat * to * across.. Ending with 1 DC in last chain.
Row 2.) Ch. 3, turn.. (We are not starting V- Stitch yet).. 2 DC’s in First Space between DC’s , skip the 2 DC’s then 2 DC’s in next space.. Continue this across putting a 1DC in Ch.3 space at end of row.
**Now we will start the V-Stitch.**
Row 3.) Ch. 3, turn .. 2DC’s in-between the 2DC’s of previous row. Continue this pattern across, ending with DC in Ch.3 space.
Row 4-32.) You will repeat Row 3 for another 29 rows = 30 total rows.
**Now you will be doing a few “short” rows for the neck gap.

Continuing with V-stitch…**
Row 33.) Ch. 3,turn , 2DC’s in -between prior DC’s, Repeat 48 more times, Place 1 DC in next V stitch.
You should have a total of 49 – 2DC’s & 1 DC
Row 34.) Ch.3, turn, V-Stitch across, DC in Ch.3 space
Repeat Row 34 …4 more times.. Total of 6 short rows for neckline.
** Now you will be making the other front “Flap”..
go back to making “long” rows. **
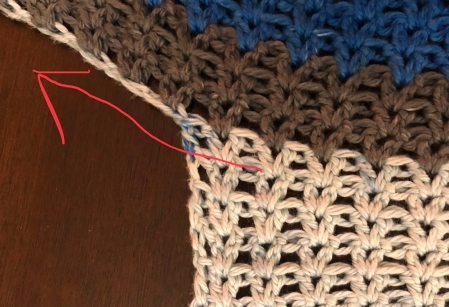
The Red Arrow shows you the chain you be adding at end of Row 39.
Row 39.) Ch. 3, Follow V-Stitch pattern til you come to Last V-Stitch on “Short Rows”…DO Not Turn… Your going to chain 97 + 3
Note.. Make sure to maintain the Same tension as Starting chain. If you do this chain to tight or loose it will not match up with previous side. Also Make sure to not twist your chain as you work back along it.
Row 40.) Turn and start in 3rd chain from hook… 2DC’s in first chain, *skip a chain, 2 DC’s next*… work * to * along chain and previous V stitch row til end, DC in Ch.3
Row 41.) Ch.3, turn, V-stitch across, DC in Ch.3
Repeat Row 41 for 28 more rows… 30 rows total.
Row 69.) Ch.3, turn, DC in first “space”. ( Not in V stitch), 2DC’s in each space between V-stitch across.
Row 70.) Ch.3, turn, 2DC’s in between DC’s, Repeat across, DC in last space.


Fasten off and Hide ends.

THIS PATTERN WAS MADE AND DESIGNED BY WULFIESESSENTIALS©. YOU MAY MAKE AND SELL THE ITEMS MADE FROM THIS PATTERN, BUT PLEASE LINK BACK TO MY SITE. YOU MAY NOT ALTER, REPRODUCE, SELL OR DISTRIBUTE THIS PATTERN. DO NOT USE THE PHOTOS ASSOCIATED WITH THIS PATTERN WITHOUT PERMISSION.
WulfiesEssentials© is neither paid or affiliated with any persons &/or Business mentioned in this post. Any “review” is solely my opinion based on use of the Item mentioned in this post.


What a gorgeous piece! Thanks for sharing the pattern!
LikeLike
Thank you so very much. 🙂
LikeLike