Betsy Flag Vest

The Besty Vest was spawned by a thought of the usual cool nights out watching fireworks. I wanted something light but enough to keep the chill off, yet still be festive.
To be completely honest.. this pattern was a hot mess for me. I seriously thought about not writing this… But if anything it would make a great Crochet Flag haha
While working on this pattern I was so focused on trying to make it without having 500 million ends to weave in that the top portion had to be frogged a few times… Please proceed with caution 😉 I do not have testers for my patterns and this has alot of steps.
This pattern can be modified to fit Small, Medium, Large or XL Adult. The pattern is specifically for the “Flag” Portion. The Rest of the vest is a “guide”. After Completing the Flag portion you will need to measure the person you are making it for and make your own adjustments.
I would rate this pattern to be intermediate to advanced.. You will need to calculate your own stitch count. I give you the basic’s to finish the project but this is a specifically made item with specific measurements.
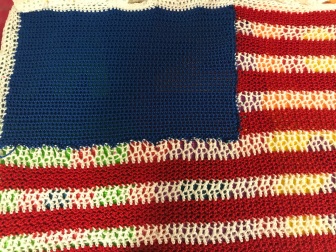
The Width of the Flag is approximately 42inches across & 18inches tall ( before blocking).
The measurements for the top part of vest are ( across shoulder blades) Arm Pit to Arm Pit approx 16 inches, Arm hole is approx 6 inches wide and from top of Pit to just below Neck is approx 6inches.
Remember to Compensate for after Blocking increase in size… The Flag must be blocked to look correct.
WHAT YOU WILL NEED….
1 skein RED, 1 skein Blue & 1 to 2 skeins White… I used Caron Simply Soft
12mm, 10mm & 9mm Hook
Measuring Tape, Stitch Markers, Scissors, Tapestry Needle, Blocking Board w/ pins
STITCH ABBREVIATIONS…
SC = Single Crochet DC = Double Crochet HDC = Half Double Crochet
SS = Slip Stitch HDC2TOG = Half Double Crochet 2 Stitches Together
SK = Skip Stitch SM = Stitch Marker
You will also need to know how to Change Colors at the end of the Row.. This Video shows how I have changed colors in this pattern… Marly Bird Video. I have been using this way to change colors forever … Great Video.
PATTERN….
Using 12mm… Chain 120
Row 1.) In 2nd chain from hook, SC- ch 1.. *SK – SC nxt 2- ch 1*.. Repeat * to * across.. SC last Ch
Row 2.) Ch 1, turn, SC in 1st stitch – ch 1.. * SK – SC nxt 2- ch 1* Repeat * to * across.. SC last stitch
Row 3 & 4.) Repeat Row 2… Change color to white at last SC
Row 5.) Ch 2, turn, DC in first stitch- ch 1.. *SK – DC nxt 2- ch 1* Repeat across.. DC last stitch
Row 6.) Repeat Row 5… Change color back to red at end of last DC
Row 7.) Ch1, turn, SC in first stitch – ch 1 ..*SK – SC nxt 2- ch 1* Repeat * to * across.. SC last stitch
Row 8, 9, 10 & 11.) Repeat Row 7 .. change color to white at last SC ***** NOTE**** because of the starting chain.. to make rows look even we will be doing 5 rows of red instead of the initial 4 rows.
Row 12.) Ch 2, turn, DC in first stitch – ch 1, *SK – DC nxt 2 – ch 1* Repeat * to * across, DC last Stitch
Row 13.) Repeat Row 12… Change color to red at last DC
Row 14.) Ch1, turn, SC in first stitch – ch 1, *SK – SC nxt 2 – ch 1* Repeat * to * across, SC last stitch
Row 15, 16, 17 & 18.) Repeat Row 14.. switch colors on last SC on row 18 to white
Row 19.) Ch 2, DC in first – ch 1, *SK – DC nxt 2- ch 1 * Repeat * to * across, DC last stitch
Row 20.) Repeat Row 19, Changing to Red at last DC.
***PAUSE*** Before you continue……You should have a total of 80 DC’s in the row you just finished…. You will need to count back from where your hook is… 40 DC’s and place a stitch marker. You will be now doing “short” rows of red and white, leaving a blank open square for the Blue portion of the flag.
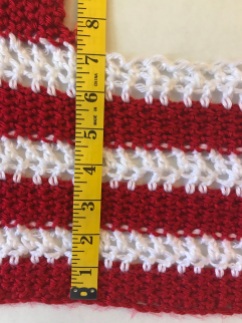
Your Flag portion should be approx 42inches ( not stretched) and 7 inches high ( also not stretched)
Row 21.) Ch 1, turn, SC first stitch- ch 1.. *SK – SC nxt 2 – Ch1* Repeat * to * across til you reach SM .. SS in chain marker place ( 41st stitch)
Row 22.) Ch 1, turn, skip SS and SC in next Stitch – Ch1… * SK – SC nxt 2 – Ch1* across.. SC last stitch
Row 23, 24, 25 & 26.) Repeat Row 22 **** Note*** Again I increased the red rows.. I wanted to keep all my ends on one edge of flag. You can omit this extra row If you wish.. It would make your Flag a tiny bit shorter doing so.*******
Row 27.) Ch2, turn, DC first stitch, Ch 1 – * DC nxt 2 – Ch1* Repeat * to * across, DC last Stitch
Row 28.) Ch2, turn, Repeat Row 27 Changing to Red at end of last DC
Row 29.) Ch 1, turn, SC in first stitch, Ch 1 – *SC next 2 – Ch1* Repeat *to* across, SC last stitch
Row 30,31,32,33,34.) Repeat Row 29, Change to White at end of last SC
Row 35.) Ch 2, Turn, DC first stitch, Ch 1 – * DC next 2 – Ch1* Repeat * to * across, DC Last stitch
Row 36.) Ch 2, Turn, Repeat Row 35, Change to Red at end of last DC
Row 37.) Ch 1, turn, SC first stitch, Ch 1 -*SC next 2 – Ch1* repeat *to* across, SC last stitch
Row 38,39,40,41,42.) Repeat Row 37, Switch to White at end of last SC.
Row 43.) Ch 2, turn, DC first stitch, Ch 1- * DC next 2 – Ch 1* Repeat * to * across ,DC last stitch
Row 44.) Ch 2, Turn, Repeat Row 43, Switching to Red at end of last DC
Row 45.) Ch 1, Turn, SC in first stitch, Ch 1 – * SC next 2 – Ch 1* Repeat * to * across, SC in last stitch.
Row 46,47,48,49,50.) Repeat Row 45, Tie off.
This is what your Flag portion should look like at this point.
Blue Portion of Flag
Changing to 10mm
Ch 62
Row 1.) SC 2nd chain from hook, SC across (60 SC’s)
Row 2.) Ch 1 SC first stitch – SC across
Row 3 – 42.) Repeat Row 2
Now to attach the blue portion to the red and white. The blue will be slightly smaller..

Depend on the choice of Sewing or Crocheting the 2 pieces together you will want to make sure the seam is on the reverse side of the flag ( as shown above)
Start with the Long ( width) first. Making sure to sew/ crochet stitch to stitch across (60)
When sewing/crocheting up the top portion… You will need to stretch the blue out a bit. Every few stitches you will need to stitch 2 of the red/ white into the same blue stitch.
You will now need to block your Flag, concentrating on squaring up the blue. It should be stretched out a bit but not over stretched. The purpose for using a smaller hook was to make the blue portion a tighter stitch. This is necessary for sewing on & securing the Stars.
Sorry for the weird colors…. I made my own blocking boards from the “Kiddie” mats & their a bit obnoxiously colored 😦
The next step is where you customize the fit for your Betsy Vest. You will need the measurements as discussed at beginning of pattern to fit the person you are making this for. Pit to Pit, Pit to Neck and Width of Pit.
You will lay your flag out flat.. Your going to need to find you ” pit to pit” area and use stitch markers to mark it. The Measurement I’m using is 16inch.

That gives approx 13 inches on either side.. If you divide the 43 inches by 3 ( front, back, front) you get approx 14inches per section. I needed 16 so I deducted 1 inch from each side.. giving me 13, 16, 13 inches. I measured 13 inches in from each end and placed a stitch marker on each side. Now I have stitch markers at the begining of each side of the pit to pit section ( 16 inch area).
USING A 10mm hook…Starting on the blue corner side.. Using White… You will Ch 1, HDC in first stitch, HDC across ONLY in SC stitches… DO NOT HDC in ch 1 spaces. When you come to the SM, Remove it and Replace it in the new stitch made, Continue to HDC across, Removing Second SM and replacing it in new stitich.
Row 2.) Ch1, Turn, HDC across, replacing SM in new stitches made as you go across.
**** NOW, your going to add another 2 stitch markers…. Width of Pit area…. Measure from each current Stitch marker the approx measurement you need and place SM. I needed a 3 1/2 inch space for my pit width. Make NOTE of how many stitches are in this Pit width area.
Right SM is the start of my 16inch back section.. Marker to left is beginning of Pit section.. Space between SM’s is the arm hole space.
Back to the HDC’s…
Row 3.) Ch1, turn, HDC to the first SM (pit)…. SS ( loosely) in SM space and all other stitch’s til you reach Next SM, HDC in Next SM space and across to next SM, HDC in that SM, SS in nxt stitch after SM across to last SM then HDC remaining. *** remove SM’s and place in new stitch made***
Row 4,5,6.) You will repeat Row 3 .. 3 more times.. total of 4 rows of SS, HDC’s
Remember the stitch count you jotted down for the pit width area?? Depending on the person, You will need to atleast double that count for the next step. My stitch count was 12 so I doubled and added 1 .. 25.. This 25 is going to be what goes up and around the shoulder… From front of pit over shoulder to back of pit.
Row 7.) Ch 1, turn, HDC to first SM, Chain 25 ( Your stitch count) and HDC into Second SM, HDC to next SM, Chain 25( your stitch count), HDC into Last SM, HDC across… At this point you can remove your SM’s.
Row 8.) Ch1, turn, HDC across…Making sure to HDC in every Chain space.
Because you have just added double ( or more) stitches to your vest.. you will have to decrease your stitches as you go for the remainder of your vest.
Row 9.) Ch 1, turn, HDC across to beginning of Armhole ( place SM ), HDC2TOG, *HDC nxt 5 – HDC2TOG* repeat across to beginning of other armhole, HDC across….
Keep track of how many decreases per row you are doing… You will be decreasing til you come back down to original 120 stitches. YOU will ONLY be decreasing from beginning of armhole to beginning of other armhole.. NOT the front flaps.
Row 10.) Ch1, turn, HDC across.
You will repeat a pattern of 1- Row 9, 1-Row 10… until you reach a stitch count of 120.
When you reach the row count of 120.. Measure the length of the WHITE section only. This is the PIT to Neck measurement. If you are at that length stop.. your done. IF not continue to do Rows of JUST HDC ( no decreases) til you hit your measurement.
When you are done.. It’s time to do your edging.
Edging is 4 rows of HDC’s from bottom of front flaps to top of front flaps… on both sides. Using a 9mm hook.
STARS for FLAG…
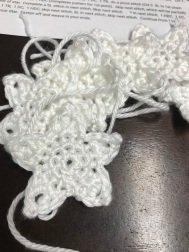
For the stars I used a pattern I found Online… I did have to modify it a tad bit as they were too big for the flag.
Stitch4Ever.. You will need to scroll a little to see the pattern.

These are my version…
I used a 3.5mm Hook for these.
I did 8HDC’s in MC and omitted the HDC.
My Stars consist of DC, TR,Picot,TR,DC
This made my stars smaller and a little more pointy.
Make 13.. Block them, then sew onto blue portion of flag.. YOUR DONE 😉
Any questions please feel free to contact me.


Oh Sandi this is such a fun design!! You are so clever with your hook!!! 😀
LikeLiked by 1 person
Thank you so very much tami.. I appreciate your kindness. Sometimes it’s easier to have the vision than it is to actually make it hahaha
LikeLike
Oh my gosh Sandi tell me about it!! 90% of my projects are from my “visions” and when I plan it out in my head it always seems like it’s going to be easy peasy!! hehehee Good for you to actually write it down. I always forget to take notes! 😀
LikeLiked by 1 person
Reblogged this on stitchinshishums and commented:
This is such a cool vest, I can’t wait to try out the pattern. I will post it when I’m done. Thank you so much Sandi for sharing your ;lovely pattern.
LikeLiked by 1 person
Wow… Thank You 😊
LikeLike
Beautiful Work!!! Beautiful!
LikeLiked by 1 person